Wednesday, September 28, 2016

Slow Cooker Tuscan chicken and white bean soup

You know that feeling when the nights become cooler all of a sudden? The evenings get darker earlier... all signs pointing to fall approaching! I had a night like that the other night. When that happens the first thing that I want to eat is a comforting homemade soup. I really want to expand my soup repertoire this year so I chose a new recipe called Slow Cooker Tuscan Chicken White Bean soup. Any soup I can make in the slow cooker is a win-win in my book. If I put the work in at the beginning then I get to just sit back until the final step in serving it up. I am also win with the slow cooker because I can smell the deliciousness coming from it throughout my house all day! YUM! This recipe delivered that satisfying comfort food feel without the unhealthy elements. It was a very nutritious filling soup. The recipe calls for fresh Parmesan cheese on top but I substituted fresh shredded mozzarella from my cheese grater. It was definitely a good choice.  You can also prep this ahead of time into a delicious freezer meal!

Slow Cooker Tuscan Chicken and White Bean Soup
Didn't this turn out to be a delicious looking soup?!


PREP TIME
COOK TIME
TOTAL TIME

Serves: 6
INGREDIENTS
·                        2 (15-oz.) cans white beans, drained and rinsed
·                        1 (15-oz.) can fire-roasted diced tomatoes (do not drain)
·                        2 cups sliced carrots
·                        1.5 cups diced celery
·                        ½ cup diced white onion
·                        1 garlic clove, minced
·                        2 bay leaves
·                        1 tsp. dried oregano
·                        1 tsp. dried thyme
·                        1 tsp. dried rosemary (crush in hand)
·                        ½ tsp. salt
·                        ¼ tsp. pepper
·                        1 (32-oz.) box chicken broth
·                        1.5 lbs. boneless skinless chicken breasts

INSTRUCTIONS
To make this into a freezer meal:
1.                Place everything into a gallon-sized Ziplock bag, squeeze out air before sealing. Freeze for up to a month. Thaw in fridge for 36 hours, then follow cooking directions below.
Cooking instructions:

1.                Add everything to the slow cooker. Cover and cook on LOW for 8 hours. Discard bay leaves. Shred the chicken with two forks right in the slow cooker. Serve topped with parmesan cheese. Enjoy!


Tuesday, September 27, 2016

One Pan Autumn Chicken Dinner

It's finally fall!! Fall is my favorite time of the year. It's not just the cooler temperatures, changing colors, and the fall festivities... but the smells and tastes of the season! I love apple, pumpkin, and cranberry everything!!!! For the last few weeks I have been working in my kitchen already delighting in apple pumpkin dishes. We have made pumpkin-apple butter, pumpkin muffins, pumpkin spice cake, and homemade apple sauce just to name a few. But it's more than just apples and pumpkins. Last week I made a one pan dish that was the very essence of fall flavors -- and very easy to make! The recipe is from one of my favorite food blogs called Cooking Classy. 
How beautiful is this dish?! So many beautiful colors!

One Pan 
Autumn 
Chicken Dinner
Yield: About 4 servings
Ingredients
  • 4 - 5 (6 - 7 oz) bone-in, skin on chicken thighs
  • 4 Tbsp olive oil, divided
  • 1 1/2 Tbsp red wine vinegar
  • 3 cloves garlic, minced
  • 1 Tbsp each minced fresh thyme, sage and rosemary, plus more for serving
  • Salt and freshly ground black pepper
  • 1 large sweet potato (peeled if desired), chopped into 3/4-inch cubes
  • 1 lb Brussels sprouts, sliced into halves
  • 2 fuji apples, cored and sliced into half moons about 3/4-inch thick
  • 2 shallot bulbs, peeled and sliced about 1/4-inch thick
  • 4 slices hickory smoked bacon, chopped into 1-inch pieces
Directions
  • Preheat oven to 450 degrees. Pour 2 Tbsp olive oil, red wine vinegar, garlic and herbs into a gallon size resealable bag, add chicken, season with salt and pepper then seal bag and massage mixture over chicken while working to evenly distribute herbs. Set aside and let rest while chopping veggies.
  • Place sweet potato, Brussels sprouts, apples and shallot on a large rimmed baking sheet. Drizzle with remaining 2 Tbsp olive oil then toss to evenly coat and season with salt and pepper to taste. Spread into an even layer then set chicken over veggie/fruit mixture. Sprinkle bacon (separate any pieces that stick together) evenly over veggie/fruit mixture. Roast in preheated oven until chicken and veggies are golden brown, about 30 minutes (chicken should register 165 in center). Broil during last few minutes for a more golden skin on chicken if desired. Sprinkle with more herbs and serve immediately.
  • Recipe source: http://www.cookingclassy.com/2015/10/one-pan-autumn-chicken-dinner/


Saturday, September 3, 2016

Slow Cooker Pumpkin Spice Chex Mix

I absolutely love fall! It is my absolute favorite time of year!! There is just something about the crisp cool air, the beautiful colors around, festivals, and of course pumpkin-spiced EVERYTHING! My husband runs the Libby's pumpkin plant so we have our fair share of pumpkin recipes around here, but I love just the flavor of pumpkin spice as well! Starbucks revolutionized pumpkin spice flavor with their Pumpkin Spice Lattes and since then the market has grown! Pumpkin spice cheerios, pumpkin spice oatmeal, pumpkin spice chocolate kisses, etc..... the desire for pumpkin-spice is HUGE!
I love Chex Mix as much as the next person, especially when I can make it in my slow cooker! I love the basic original recipe with the brown sugar, Worcestershire, butter, etc. But I came across a new recipe for slow cooker pumpkin spice chex mix. With September starting this past week I couldn't resist making it to taste the flavors of fall! So yesterday I decided to make this delectable snack mix with my daughter Lucy. She loves to help me pour all of the ingredients into the slow cooker and stir it. So it was a good activity for the two of us to do together. After the mix had cooled so we could try it we were in love! The snack mix won't last long around here but at least it's easy to make. If you make it you won't be able to stop!
So here is our new fall staple snack in our household..... will it be part of yours???
NOTE: There are several things you can add to this mix or leave out making it a custom snack for your family. I used Rice Chex, Whole Wheat Chex, Plain peanuts, Ancient Grains Cheerios, pretzel sticks, raisins, and cherry craisins for my mix ins.

CROCK-POT MAPLE PUMPKIN SPICE 

CHEX MIX

My Chex Mix in a gallon ziplock. 

Recipe courtesy of: 
YIELD: about 8 cups
 
PREP TIME: 5 minutes
 
COOK TIME: about 2 hours
 
TOTAL TIME: about 2 hours, overnight is better for drying

INGREDIENTS:

6 cups Chex cereal (I used 3 cups each Rice Chex and a storebrand honey-nut Chex; try Cheerios, Golden Grahams, etc.)
2 cups dried fruit (I used 1 cup each dried cranberries and dried cherries; try (golden) raisins, etc.)
1 1/2 to 2 cups nuts (I used 3/4 cup each honey-roasted cashews and honey-roasted peanuts)
1 1/2 to 2 cups pretzels
1 1/2 chopped graham crackers, diced in large 1-inch pieces (about 5 full-size graham crackers)
1/2 cup unsalted butter, melted
1/2 cup maple syrup (I used sugar-free pancake syrup)
1/4 cup light brown sugar, packed
1 to 2+ tablespoons pumpkin pie spice
1 tablespoon vanilla extract
salt, optional and to taste

DIRECTIONS:

  1. In a 5 to 6-quart Crock-Pot, add cereal, dried fruit, nuts, pretzels, and graham crackers. Recipe is very flexible. If you don't have something, don't like something, etc. use something you do have on hand or omit.
  2. In a microwave-safe measuring cup or bowl, melt the butter, about 1 minute on high power.
  3. Add the maple syrup, brown sugar, pumpkin pie spice (I used 1 tablespoon but recommend at least 2 tablespoons if you want a more pronounced pumpkin flavor), vanilla, optional salt, and whisk to combine.
  4. Slowly and evenly drizzle wet mixture over the dry ingredients in Crock-Pot and stir very well to combine. I use a silicon-tipped spatula so I don't break the cereal.
  5. Cook covered on high power for about 2 hours, stirring well every 15 to 20 minutes. Start keeping a more careful eye on mix at about 1 1/2 hours to make sure pieces on bottom don't start burning. All slow-cookers and ingredients vary, and cooking times will vary. Cook until there's no visible liquid pooling and pieces have dried out. They will not be 'dry' and will be more on the sticky and tacky side even when done, but do dry out more as they cool. Note - Although I haven't tested it, you could probably bake in a 250F oven, with the mixture divided between two baking trays. Keep a very watchful eye on it and toss every 15 minutes until it's done.
  6. Turn mixture out onto baking tray and allow to dry for at least 2 hours, overnight is better. Mix will keep airtight for up to 5 days.


Tuesday, August 30, 2016

Nestle' Tollhouse Pie... An American Comfort food


Toll House Chocolate Chip Pie - incredible! It has the classic flavors – a sweet, buttery batter with chocolate chips and walnuts – but in pie form!

Last night we were able to celebrate my dad's 69 birthday! Instead of making a cake I decided to make a pie. I didn't plan ahead like I normally do so I decided to see what I had in stock. I had all of the staple ingredients for a Nestle tollhouse pie! It's like taking America's favorite cookie and placing it into a pie. You mix all of the ingredients and then pour it into the pie crust. After baking it the ingredients split into several layers of ooey gooey goodness that is out of this world! After you have enjoyed this pie you can enjoy the leftovers by heating up a slice for 10 seconds in the microwave. 

NESTLÉ® TOLL HOUSE® CHOCOLATE CHIP PIE

INGREDIENTS

  • unbaked 9-inch (4-cup volume) deep-dish pie shell *
  • 2 large eggs
  • 1/2 cup all-purpose flour
  • 1/2 cup granulated sugar
  • 1/2 cup packed brown sugar
  • 3/4 cup (1 1/2 sticks) butter, softened
  • 1 cup (6 oz.) NESTLÉ® TOLL HOUSE® Semi-Sweet Chocolate Morsels
  • 1 cup chopped nuts
  • Sweetened whipped cream or ice cream (optional)

INSTRUCTIONS

PREHEAT oven to 325° F.

BEAT eggs in large mixer bowl on high speed until foamy. Beat in flour, granulated sugar and brown sugar. Beat in butter. Stir in morsels and nuts. Spoon into pie shell.

BAKE for 55 to 60 minutes or until knife inserted halfway between edge and center comes out clean. Cool on wire rack. Serve warm with whipped cream, if desired.

* If using frozen pie shell, use deep-dish style, thawed completely. Bake on baking sheet; increase baking time slightly.

Friday, August 12, 2016

When life gives you lemons... Make Lemonade (and clean the kitchen sink)!

Summertime is one of those times where you have to make essential summer time drinks like sweet iced tea, flavor infused waters, and my favorite - homemade lemonade!!! One of my favorite recipes is for a Lemonade Punch. We used to serve this every year at our annual 4th of July party! It was always a hit with everyone from the adults to the kids. Just plain summertime goodness in a glass! 

Best Ever Lemonade Punch

1 cup Countrytime Lemonade mix

2 cups cold water

1 can of chilled pineapple juice {46 oz}

2 cans chilled Sprite

Mix all of this together in a drink dispenser and you have a 

great summer time drink for all of your get togethers. I 

always cut up fresh lemons to float in the punch among the 

ice. 


After you have sliced up fresh?  lemons for your punch what do you do with the leftover slices?? Did you know that lemons are an amazing cleaning agent? If you rub lemons over the surfaces of your kitchen sink they will get rid of hard water residue. You can also slice them up and put them down your garbage disposal. The lemons will clean your garbage disposal as well as giving it a fresh lemon scent. 

This week after I used lemons on my sink I decided to go a step further. My drain wasn't draining like it usually did as it was going much slower. I took a 1/4 cup of baking soda and pour 1 cup of vinegar (my other favorite cleaning solution) over the top. If you plug the drain it will bubble and fizz. Scrub it all over your sink and let it it in your sink for 15 minutes. Then rinse with hot water. If I am primarily cleaning the drain I will boil a large pot of water then pour it down the sink to clean it out thoroughly.

Here is my final result....


Thursday, August 4, 2016

My favorite slow cooker breakfast - Slow Cooker Oatmeal!

Breakfast..... The most important meal of the day! Well it should be anyways.... I always make breakfast for my kids but many times I forget myself. Many times I will make the kids' breakfast and then an hour later after I have had one LARGE cup of coffee to wake myself up I will make eggs or have some fruit. While I love breakfast foods I find it difficult to eat in the mornings.... hence why I LOVE breakfast for dinner. It may be the only time I will actually feel like eating it. 
Around our house I want to make sure both Jack and Lucy have had something they enjoy that is filling first thing in the morning. Breakfast is the only meal where I may make more than one thing just to make sure they both get a jump start in their day. Jack is my picky eater but will eat the majority of breakfast foods. In fact the only meat he will eat for me is bacon! Jack loves everything from eggs, waffles, pancakes, or cereal. Lucy will always choose oatmeal if given the choice. We usually make simple instant oatmeal packets in the microwave or I will have pre-made freezer oatmeal cups that I can heat up. Any way she can get it Lucy is absolutely obsessed with oatmeal! My favorite way to make oatmeal these days is in the slow cooker. There are two recipes that are my go-to slow cooker oatmeal recipes. You just add the ingredients before going to bed, set your crockpot on warm or low (depending on your slow cooker), and wake up to smell a delicious hearty breakfast waiting for you. When I make these...I eat breakfast right away because after smelling how delicious these are I just can't resist! You won't be able to either! 

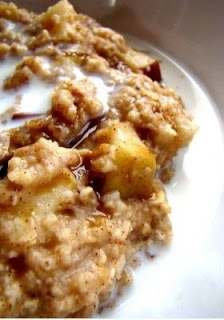
Apple Cinnamon Slow Cooker Oatmeal


  • 2 apples cut into slices
  • 1/3 cup brown sugar
  • 1 tsp of cinnamon
  • 2 cups oatmeal (old fashioned or  steel cut oats are my preference)
  • 4 cups water (or 2 cups milk of your choice and 2 cups water.... I use almond milk and water)
Stir apples with brown sugar and cinnamon. Place the covered apples at the bottom of your crockpot. Pour uncooked oatmeal over the top, followed by your water or milk. DO NOT STIR! Place the lid on your crockpot and set on low or warm overnight for 8-9 hours. In the morning ENJOY!


Overnight Pumpkin Pie Oatmeal
  • 1 1/2 cup of steel cut oats
  • 4 1/2 cups of water depending on how thick or thin you want your oatmeal
  • 1 cup canned pumpkin puree (I recommend Libby's)
  • 2 tsps pure vanilla extract
  • 2 tsps pumpkin pie spice
  • 1/4-1/2 cup brown sugar depending on your taste
Combine all ingredients in your slow cooker and place on low for 6-8 hours. Season with more brown sugar in the morning if you like. I like to garnish my oatmeal with raisins, craisins, or pecans. It's like immersing yourself in fall with every bite! 


Tuesday, August 2, 2016

Freezing tomatoes (the easy way)

For the past 3 years I have utterly failed at growing a garden. I am not good at weeding (partially due to allergies), but I honestly just don't like it. So for the past few years I haven't had fresh garden tomatoes from my own garden. There is just something about knowing you grew your own produce... it just tastes better! 
Last year I purchased large quantities of tomatoes from one of our friend's local organic farms. Their tomatoes were delicious and had beautiful color. I decided to take an afternoon to freeze the tomatoes, however something didn't work because a month later when I went to get some diced tomatoes out of the freezer they had a white mold growing on them. So into the trash they went. 
This year I was bound and determined to freeze tomatoes and have them work so I can add them to soups and chili's this fall/winter. After searching on Pinterest and reading through several different methods this one sounded the easiest since there was no pre-boiling or removing of skins. It also came from a huge canning website - so hoping it will work for us. 
Yesterday I gathered a group of my tomatoes out of my garden and decided to give this new method a try! 
Step 1: Gather your tomatoes, a cutting board, good knife, food processor,  and muffin tins.

Step 2: Remove the core of the tomatoes and dice them up! Remove as many of the seeds as possible! 

Don't they look delicious!

Step 3: Add tomatoes in small groups to your food processor and puree to desired texture. I like a few chunks of tomatoes in mine. 

Yum! - Preparing for puree!

Step 4: Spray your muffin tins with a cooking spray. Pour pureed tomatoes into muffin tins. Freeze for 4 hours.

To remove tomatoes: Set muffin tins in warm water to loosen discs. Put discs into labeled freezer bags and place in freezer! ENJOY later! 

Monday, August 1, 2016

My Favorite Freezer Meal

Four years ago my husband and I were blessed with the adoption of our son Jack when he was just 3 days old. Three months later we found out we were pregnant with our daughter Lucy. They are just 11 months apart which made for a very busy beginning to motherhood! I discovered the art of making freezer meals. I even joined a freezer meal swap group. There were 10 families involved and each family made 10 of the same meal. Once a month the girls would get together at someone's house and we would enjoy snacks and swap meals. We came away with 10 different meals for the month! This was a huge relief for me once I had my daughter. Freezer meals were now a part of my normal monthly routine! 
As many of you know I am a HUGE fan of the Pioneer Woman, Ree Drummond. She has so many great ideas for freezer meals but there is one meal she makes that is my absolute favorite. It's not healthy but it is the epitome of comfort food in one dish! I am talking about none other than Sour Cream Noodle Bake. While the name doesn't sound as appetizing as I would like the dish is absolutely amazing! I recently made this freezer meal for some friends of ours. She was put on bed rest for the next 8 weeks and her husband isn't a cook. They both loved the dish and the best part was they had the option to freeze it until they needed it or to cook it immediately. 
Freezer meals are something I usually start in August (making 3-5 a month) and I continue this trend through March or so. For our family freezer meals are best for fall when my husband works 12 hour days, 7 days a week for 4 months at the Libby Pumpkin plant. There are those days when I just am exhausted from the kiddos and have no desire to cook. Then once winter hits it's nice to have freezer meals available for my family in case I get sick which happens during the winter months. Most of the meals are no-brainers to cook. Usually my husband will have to thaw out the crock-pot meal (many of which he could just dump in frozen) and turn on the crock-pot. It's that easy!! A few of the meals like the Sour Cream Noodle Bake is one where you just have to thaw out and then put into the oven to bake. It's a complete meal in itself, but we typically add a side of vegetables or a side salad. Enjoy the deliciousness!


Sour Cream Noodle Bake 

PREP TIME:
10 Minutes
DIFFICULTY:
Easy
COOK TIME:
20 Minutes
SERVINGS:
8 Servings
  • 1-1/4 pound Ground Chuck
  • 1 can 15-ounces Tomato Sauce
  • 1/2 teaspoon Salt
  • Freshly Ground Black Pepper
  • 8 ounces, weight Egg Noodles
  • 1/2 cup Sour Cream
  • 1-1/4 cup Small Curd Cottage Cheese
  • 1/2 cup Sliced Green Onions (less To Taste)
  • 1 cup Grated Sharp Cheddar Cheese
Preheat oven to 350 degrees.

Brown ground chuck in a large skillet. Drain fat, then add tomato sauce. 1/2 teaspoon salt and plenty of freshly ground black pepper. Stir, then simmer while you prepare the other ingredients. 

Cook egg noodles until al dente. Drain and set aside. 

In a medium bowl, combine sour cream and cottage cheese. Add plenty of freshly ground black pepper. Add to noodles and stir. Add green onions and stir. 

To assemble, add half of the noodles to a baking dish. Top with half the meat mixture, then sprinkle on half the grated cheddar. Repeat with noodles, meat, then a final layer of cheese. Bake for 20 minutes, or until all cheese is melted. 

Serve with crusty French bread.